To make 2020 a little bit less creepy than it was AWS has announced Container Image Support for AWS Lambda. That’s one small step for AWS, but one giant leap for everyone who uses Lambda on a daily basis. First of all, they increased container image size from 250 MB to 10 GB which opens completely new possibilities, for instance, we can make data science models serverless now. Container Image Support also allows developers to pack their code into containers and deploy it using Container registry. It is awesome, but the biggest benefit to me is that we can now run Lambdas locally without any additional tools or magical rituals! If you are unfamiliar with AWS Lambda please check AWS official documentation. In this article I will demonstrate how it works in practice, so let’s get started!
Application
The first step on our journey is the application itself, so we can start by creating a simple Java app and assemble it using Gradle build tool. To do that we need to install Gradle, execute gradle init command and follow initialization steps:
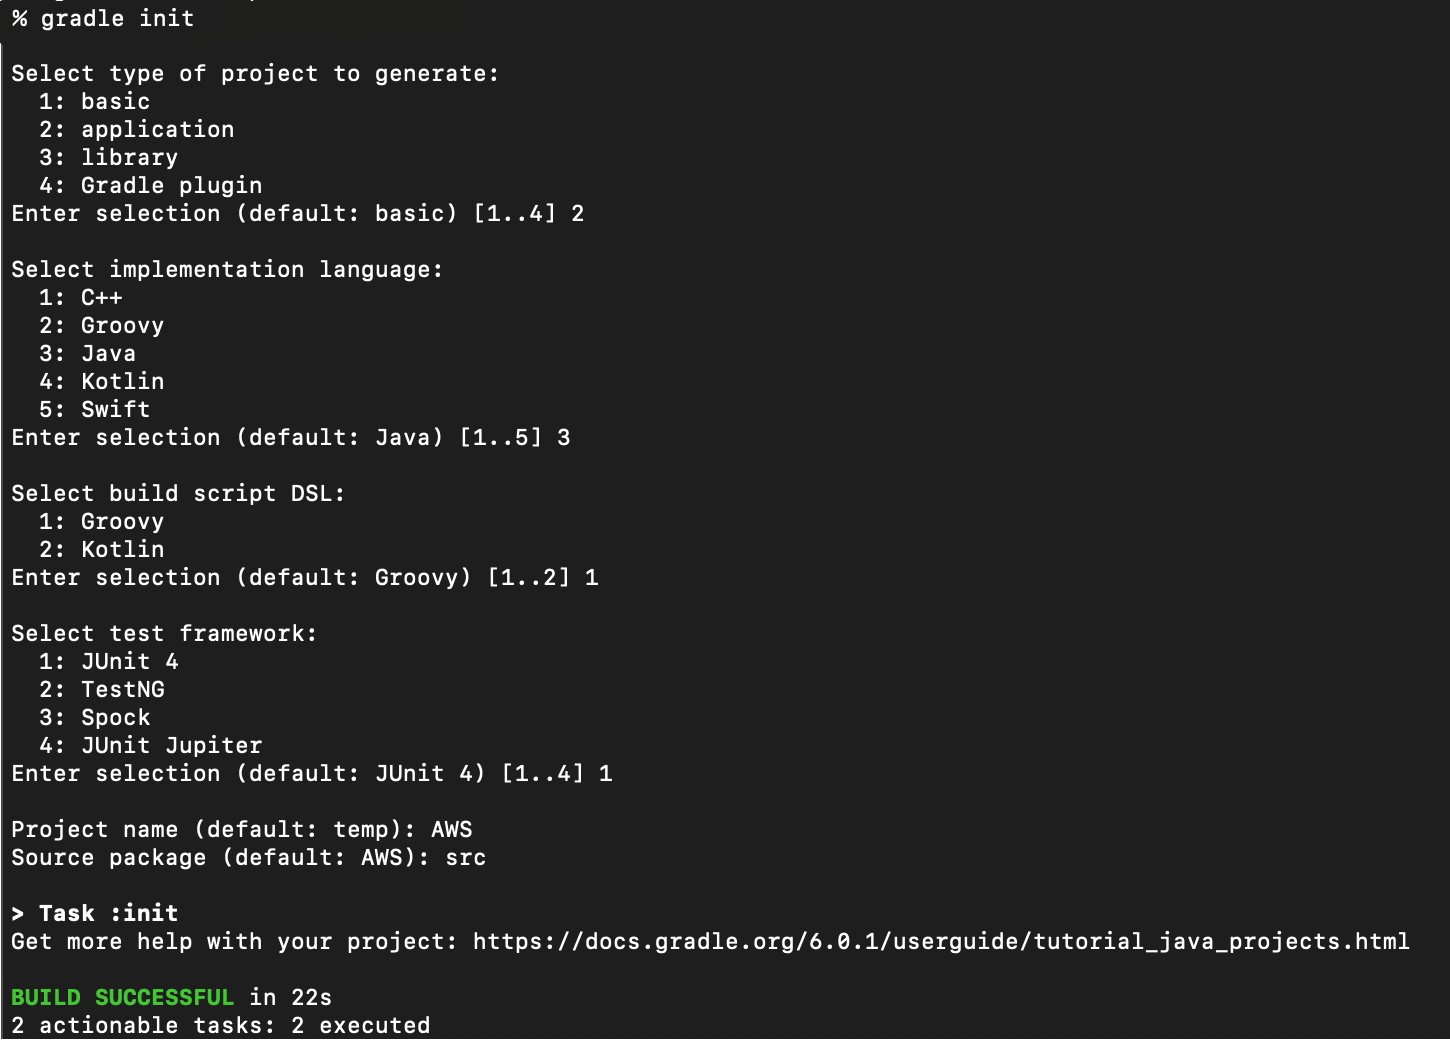
You can learn more about Java projects initialization on Gradle official website.
The Gradle init process creates a lot of unnecessary information for us, so we will clean it up a little bit. We will start with build.gradle file, let’s replace the content with following code:
1 | plugins { |
This code allows creating the most basic application, however, it is not enough for what we are going to achieve, so let's add dependency to AWS SDK to convert our application into AWS Lambda:
1 | plugins { |
Now, when AWS Lambda-Core SDK is imported, we can start changing our code. First of all, we will change the folder structure to correspond group parameter we declared inside build.gradle file. Currently our folder structure looks like following:
1 | . |
We can use an IDE like IntelliJ IDEA to perform this operation, or, alternatively, we can use command line:
1 | $ mkdir ./src/main/java/dev |
You can use different names for packages, but make sure to keep it consistent everywhere.
After the change our folder structure should be following:
1 | . |
As you can see, when Gradle initializes a new project it creates App class. Initially this class contains following code:
1 | package dev.sopin; |
Pay attention to
packagedeclaration and make sure it corresponds to your folder structure andgroupparameter frombuild.gradle.
This class represents classic Java application with the main function serving as an entry point. However, AWS Lambda is not a regular application. It is a piece of code that runs inside Lambda execution environment, so it must satisfy environment contracts. Let's adjust code of our application to make it AWS Lambda:
1 | package dev.sopin; |
As you can see, we have to implement RequestHandler interface with two generic parameters, the first parameter (Object in our case) is type of Lambda input (request), while the second one (String) is type of output, i.e. response. The RequestHandler interface requires us to implement handleRequest function, which is the main Lambda handler, so it is responsible for request processing. In our case, it simply returns "Hello from AWS Lambda!" for every request it receives.
Gradle also creates a single unit test for our application, so we need to adjust it as well (AppTest.java file):
1 | import org.junit.Test; |
Now, when Lambda code is complete, let's dockerize it.
Dockerizing Lambda
As it was mentioned above, lambdas run inside a Lambda runtime which communicates with Lambda code using the Runtime API. In order to create this communication link we need to use Lambda Runtime Interface Client, so we need to add it into the list of project dependencies in build.gradle file.
1 | plugins { |
Another important step towards dockerized Lambda is proper packaging and dependencies propagation. To ensure that everything is being built correctly and all needed artifacts are being created we need to add new copyDependencies Gradle task to build.gradle:
1 | plugins { |
This task ensures that all project dependencies are stored inside build/dependencies folder once Gradle build is completed.
Now, when our code is complete, we can try building it using gradle build command. The results of build are saved into build folder that is being generated by Gradle automatically with the following structure:
1 | . |
Please make sure that
dependenciesfolder is created.
Our code is completed and built, so it is time to create a docker container.
It is assumed that you have Docker intalled.
To do that we need to create new Dockerfile file with the following content:
1 | FROM public.ecr.aws/lambda/java:11 |
With this in place we can execute Docker build command and Docker will create new image for us:
1 | docker build . -t app-lambda:latest |
Please note that we are using one of AWS base images.
We can run new container based on this image using following command:
1 | docker run -p 9000:8080 app-lambda:latest |
This will start a new container and expose port 9000. By default, lambda runtime exposes one URL with /functions/function/invocations address, so we can call it using curl:
1 | curl -XPOST "http://localhost:9000/2015-03-31/functions/function/invocations" -d '{}' |
Which should return "Hello from AWS Lambda!" response:
1 | $ curl -XPOST "http://localhost:9000/2015-03-31/functions/function/invocations" -d '{}' |
In practice, to avoid manual overhead and errors, I tend to automate all of these steps (except invocations), for instance, using Shell scripts:
1 | #!/bin/bash |
AWS Credentials
You would often need to pass AWS credentials inside your container to make your lambda work. This can be done using Environment variables or build parameters.
WARNING: Make sure you are using this approach for local Docker images only. Do not use it for images used anywhere else as it is a security threat.
My prefered way of passing AWS credentials into container is Docker build parameters, so we can adjust our Shell script even further:
1 | #!/bin/bash |
Make sure to replace all parameters with your values.
You can check official documentation to learn more about AWS CLI Configuration Variables. With this said we have a fully working Lambda that can be executed locally.
Bonus: SAML authentication
Sometimes corporations use AD Connector to temporarily authenticate users to AWS Console against corporate Active Directory. In this case you can configure your browser to download temporary credentials for you automatically every time you login to AWS Console using browser extensions:
Credentials file is being downloaded into Downloads folder by default, so we can change Dockerfile to pick it up automatically for us:
1 | #!/bin/bash |
You can read more about it on AWS website.
Conclusion
Running Lambda locally is a great convenience as before this feature we had to use some third party tools or simply add main function to the app code to be able to execute it as a regular application, but this approach was error prone. For instance, the main function doesn’t allow checking HTTP request processing logic. Moreover, containerized approaches can help to unify deployment processes using Container Registry and provide new opportunities that were either impossible, or very difficult and economically unprofitable to implement before.
Last but not least, you can find complete project on GitHub.